
Before creating individual Steps, a Scene must first be selected or created.
Creating a New Scene
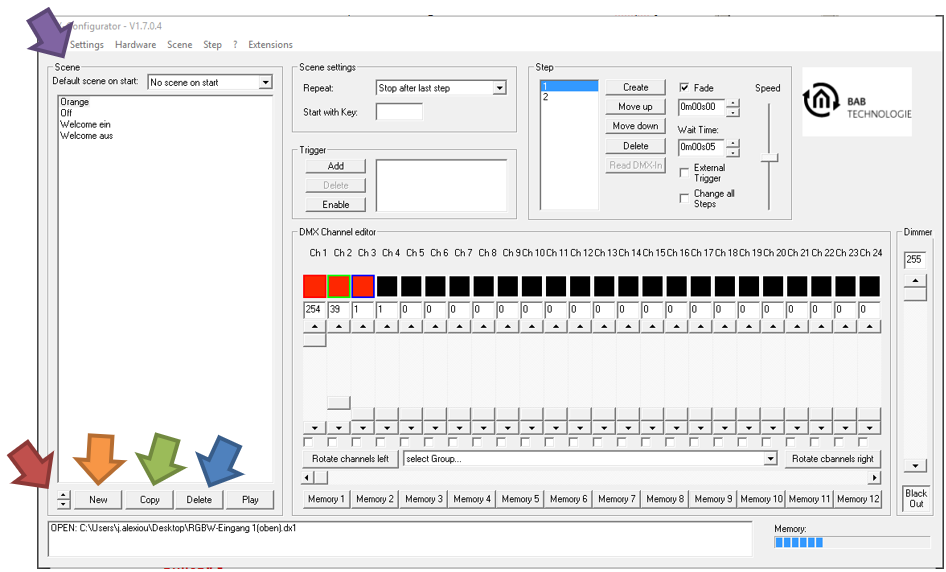
A new scene is created by clicking the "New" button (orange arrow).
A new entry named "New Scene" is then added to the scene list (purple arrow). The scene name can be edited as required.
Note
The DUODMX APP displays the first 15 characters of the scene name.
Additional Functions
|
Function |
Description |
|---|---|
|
Copy (green arrow) |
Creates a copy of the selected scene, including all associated steps. |
|
Delete (blue arrow) |
Deletes the selected scene, including all associated steps. |
|
Arrow buttons (red arrow) |
Change the order of the scenes. |
Note
When a scene is started, the DMX Configurator assumes that all DMX channels initially have a value of "0".
As a result, DMX values may be added to existing output values or remain unchanged, causing the connected DMX devices to display unexpected values or colors.
Recommendation
To avoid this behavior, each scene should begin with two initialization steps:
-
A first step with a value of "1".
-
A second step with a value of "0" for all unused DMX channels.
Between these two steps:
-
No fade time should be configured.
-
A minimum Wait Time of 10 ms should be used.
This ensures that all required DMX channels are first reset to "0" before the actual scene starts.
Depending on the application, it may also be useful to create a dedicated scene whose only purpose is to reset the required DMX channels to "0".
///