
ESF Upload & data maintenance
All group addresses and your EIS typecast with their identifiers are stored in ESF-file. This file will be generated in ETS 3.0 over File > data exchange > export to OPC-server. Data of ESF-file match the kind of project, which is created in ETS. Loaded up to CUBEVISIONMODULE, this file offers the convenience, that the placing and the clearness of group addresses will be simplified.
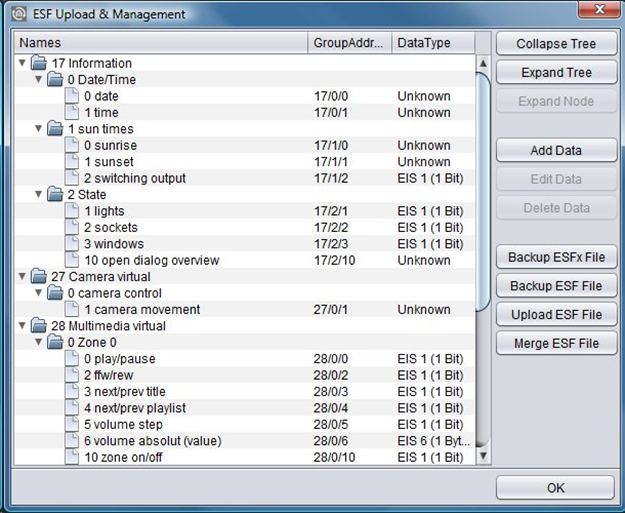
The original ESF file from ETS only contains the data type “EIS 1”; all other data type links are lost during export. If desired, the data type links can be manually updated in the ESF dialog.
For the virtual group addresses or for changings on the existing address data the dialog offers the possibility to maintain the address file. You are able to enter addresses and identifiers.
If you have made alterations in ESF data of EIBPORT already and if you are uploading this new data from ETS, your modifications will be overwritten by new data.
Collapse tree / Expand tree:
A tree outlines the complete address space of the ESF-file. In case the tree is collapsed, only main groups are displayed, otherwise (expand tree) all groups and their addresses are shown on the screen. Opening and closing of data entries inside the tree works by key click on considered arrow symbols.
Expand node:
The address space of one main group is called node. Opening one node, you can have a look at a certain part of the tree.
Add data:
This function allows filling in new, not yet existing addresses. You can enter address as well as the identifier.
Edit data:
In a marked address, you can edit the name, but you can`t edit the address.
Erase data:
Selected group address will be deleted from the ESF-file
Backup ESFx file:
This item runs a backup from CUBEVISIONMODULE as a ESFx file (xml type), to a free chosen directory.
ESF file backup:
The file will be as original ESF file saved as well as the ETS generated.
As with the original ETS export any data type links to go out EIS1 lost!
Upload ESF-file:
This button opens the file explorer to select the desired ESF-file. Click on item “Upload” will start uploading at once, without further confirmation.
ESF file inputting:
Opens an additional menu that allows a new or second ESF file can be merged into the present. An existing ESF file can thus be easily expanded with a more recent case have subsequently result in changes to the ETS project.
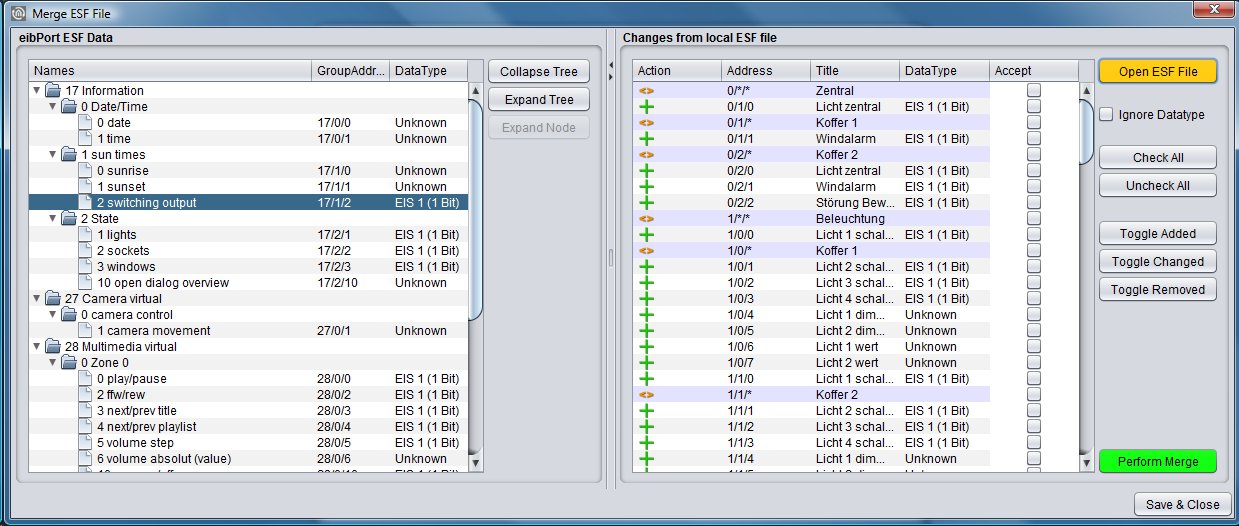
The "ESF inputting data" is divided into two halves. In the left half of the existing ESF file is displayed. In the right half of the change (not file a second ESF) which would result in merging the two files are displayed. To identify which operation is performed with which group address, the data in the column "Action" will be marked with a symbol. A "+" symbol indicates that the corresponding address of the existing ESF file is added. A "¬" means the address of the existing file will NOT be added, and the "<>" marks the addresses by the new data will be overwritten. After all necessary steps have been made, the window must be on the button "Save & Close" closed. In addition, the following switches:
-
ESF Open File: This button opens a file browser with the ESF, the desired file is selected with the extensions
-
Ignore Data Type: If this box is checked the data types are ignored during the merge.
-
Select All: There are all those actions' in the local file with the hook marked "Accept.".
-
Remove selection: The current selection is removed, all the hooks are removed in "acceptance".
-
Select New: There are selecting only the addresses (or actions) is added to the new addresses.
-
Select Changes: There will be selected all the addresses (or actions) in the existing addresses replaced by new ones.
-
Select Deleted: There are all selected addresses
Image transfer
This dialogue stores and manages images for visualization in CUBEVISIONMODULE. The images could be sorted to various categories or be deleted.
-
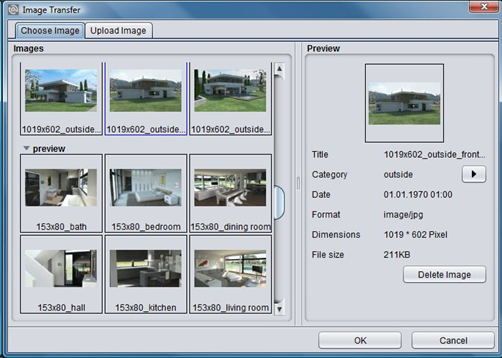
Choose Image: In this tab, all uploaded images are managed. If you mark a picture, a „Preview“ is shown in the right window. With the help of item “category”, you can refer the image to a existing or a new category. Categories and referred pictures appear in the left-hand window. Button „Delete Image“ erases the marked picture out of category.
-
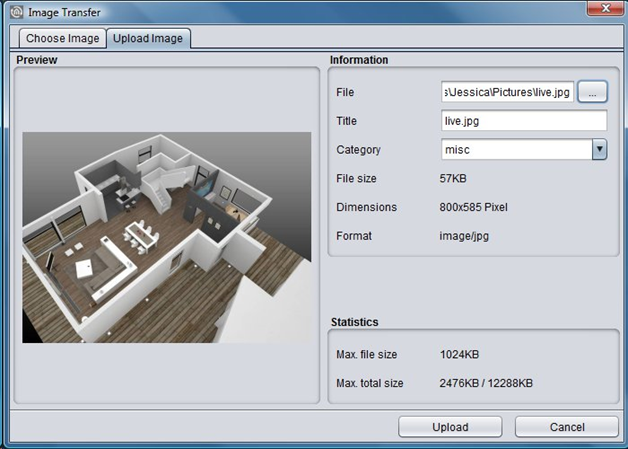
Upload Image: This tab makes possible to upload new images. Along with it, you choose a picture, which you can see right in window and then you enter a title to this image. With the help of „category“, you refer a category. Image information appears directly after selection on the screen.
In the area „statistics“, maximal permitted data size and actual used data space of your image are shown. Key click on „Upload“ starts storing images directly.
Images could also be uploaded by using „drag & drop“. Pull the desired image e.g. from desktop to visualization surface and the dialogue „Upload“ opens automatically then.
History & state-table
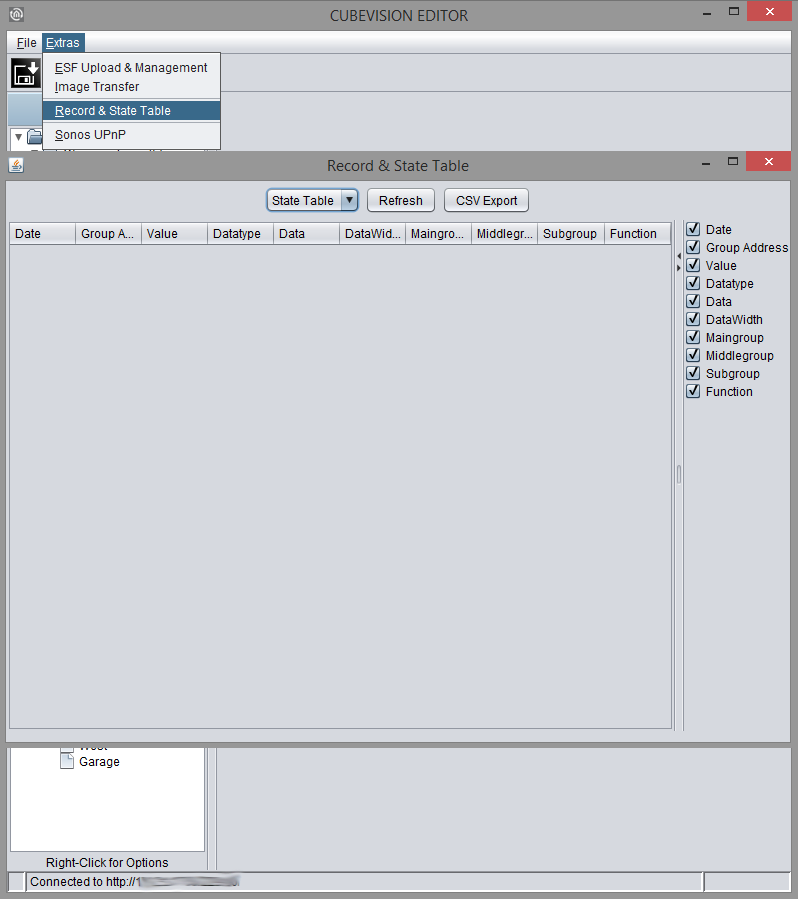
The CUBEVISIONMODULE beneath the SQLite database (500,000 frames) stores a record of the last 20,000 messages (storage ring) and provides a state table that always displays the current status of all group addresses.
A state does not exist, when the address never was used. The actual state is defined by the moment of telegram is being received. Using a backup, state table and the history table are saved as well.
-
Refresh: You can choose between state table and history table. The „Refresh“ Button loads up actual table onto the screen. This may take a while.
-
Presentation: Data will be sorted by date. On the right side, you can choose by the help of little checkmarks, which data fields should be shown. At the dividing line of the two parts you are able to hide the one or the other information by clicking the little arrows.
UPnP control
UPnP is used for remote control of compatible Hi-Fi system devices. It is controlled via group addresses with KNX buttons, room control units, KNX panels or the EIBPORT visualisation.
It is possible to control a Hi-Fi system using KNX operating devices. Functions such as playback, volume control, mute, and playlist selection can be used — provided these functions are supported by the Hi-Fi system.
///