The configuration options described in this chapter apply to all jobs in which these options are available. The instructions are applicable across all jobs.
Tabs
In case several job masks are loaded up in one window, they will be displayed above by tabs. A job, which is not stored, carries no description. You can call up any desired number of jobs.
Parameter
Every job interface has specific parameters. All red marked parameters must fill out stringently. In case that doesn`t happen, the specific job cannot be stored, because it will not work then. Every job contains one gate object, which will enable you to block one job or release it again. A gate object always been defined EIS1, one for release, zero for no release. In case one address was filled in, which wasn`t assigned before, the job remains locked, as long as group address will get one value. In case, this group address had one value before, so state of gate object correlates with that value.
Required fields
In the job editor, all input fields labelled in red are mandatory fields. These must be filled in so that the configuration can be saved.
Address fields
The colour of an address field indicates the status it is in. If an address field is highlighted in yellow, the group address has not yet been entered, if it is highlighted in red, no valid address has been entered and if it is highlighted in green, the entered data is valid. A group address can be entered using the keyboard or via the ESF dialog. This opens if you press the arrow symbol to the right of the input field. You can then select the address from the previously imported ETS data (For more detailed information, please refer to chapter "ESF Upload & Management").
Gate Group Addresses
By Gate Group Addresses job will be released or blocked. The release object releases or locks the job. It is about an EIS1 object:
-
Field blank = Job is released.
-
Field completed, value 1 = Job released.
-
Field completed, value 0 = job locked.
-
Field completed, no value = job locked.
As soon as a group address is entered in this field, the release of the job is controlled via the current value of this address.
Important: If the EIBPORT has not yet received a telegram value for the entered group address, or if there is no value in the status table, the job is blocked by default.
Allocating group addresses
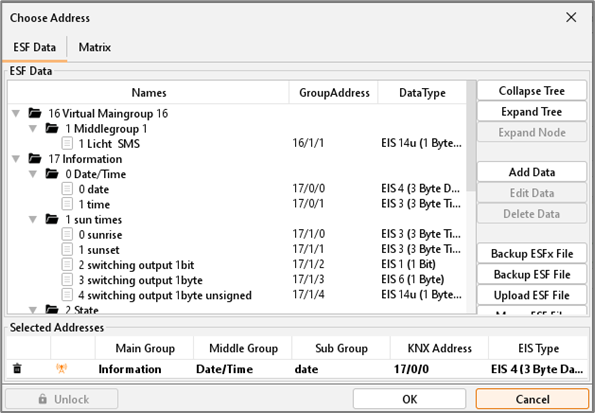
Group addresses will be filled in directly by input field or by using a schedule of addresses. Doing input directly, you can use space bar for creating symbol “/”. Address table is a matrix, in which you can choose your desired address. Open dialogue gives you the opportunity, to load up one out of ETS exported ESF file and to use it for address selection. In this way, project data out of the ETS will made available and a mixed up of addresses will be avoided. How to export ESF files and how to load it up in EIBPORT, will be described in chapter “KNXnet/IP | ETS”.
Virtual group addresses
EIBPORT not only controls address space of the main groups from 0 to 15, but also address space from 16 to 31, which are called virtual group addresses. This kind of addresses allows you for example to connect jobs at each other, without consuming addresses from real address space. Virtual addresses will not be sent to EIB/KNX.
This division between real and virtual group address space can be set individually in the ConfigTool under the "Configuration" tab in the "Advanced EIB settings" section.
Communication objects
EIBPORT emulates the structure of communication objects from EIB/KNX. That means that you can dedicate every object up to 5 group addresses. For example, with that you can simulate directly placing of an actuator`s group addresses. So EIBPORT will be informed at any moment about the actual status of the actuator (not group address) and extravagantly working with feedback can be remained undone. This procedure simplifies creating of logical links, because to every Input object of the gate will be assigned up to 5 group addresses. In dialogue of ESF, you can assign all five group addresses in this case and they will automatically enter in chosen object fields, using correct syntax. Outputs, however, only allows to enter one address.
Displaying the Datatype by using the mouse hover effect
Every address entry field of the EIBPORT jobs offer the opportunity to display the used datatype when you hover the mouse pointer over it.
General syntax
After the first group address, all of following addresses have to be enclosed in brackets and to be separated with commas.
Example: 2/12(2/13,2/14,2/15,2/16)