Astro Timer

The Astro timer determines the different points in time that a defined sun position has. That way it is possible to move e.g., a blind every time at the same brightness resp. darkness doesn’t matter if it is winter or summer. For the calculation a correct position and time information has been needed.
The Astro clock job is offering a normal and for more experienced user a more sophisticated entry form. As output datatypes there are EIS 1, EIS 5, EIS 6, EIS 14 and EIS 15 available.
Job Editot Classiv - Job Astro timer
Stages of Twilight
During the transitions from night to the day and from day to night people talk about twilight in general. It is a result of light reflection in the atmosphere and is longer in summer an in the winter shorter. To have better definability the sunrise- resp. sunset is separated into different twilight stages.
Geometric Twilight
Defines the stage on which the sun is passing the horizon in the geometrical point of view. The sun is at 0 degrees, it is nearly daytime luminous.Civil Twilight
Is the centre of the sun lying about -0.83 degrees below the horizon the civil twilight is beginning according to the definition. About this twilight stage it is spoken as long as -6 degrees are reached. Because the light will be bent by the atmosphere it is as bright as to read the newspaper outside.Nautical Twilight
During this stage the light is shining fewer, and the brightest stars are eventually visible. Talking about this stage, the sun is between 6 and 12 degrees under the horizon.Astronomical Twilight
The sun is more than 12 degrees beyond the horizon. It is such dark that nearly all stars are apparent. The range for the astronomical twilight is lying between 12 and 18 degrees.Night
In astronomical point of view, it is night when the centre of the sun is less than 18 degrees of the horizon. During that stage it is completely dark and all stars are visible.
Unit of measurement for the solar altitude
The solar altitude is specified in arc minutes. Thereby 60 arc minutes complies to one degree.
1 degree = 60 arc minutes
The numerical values behind the twilight designations in the selection of twilight stages are showing off the limits of the twilight stages.
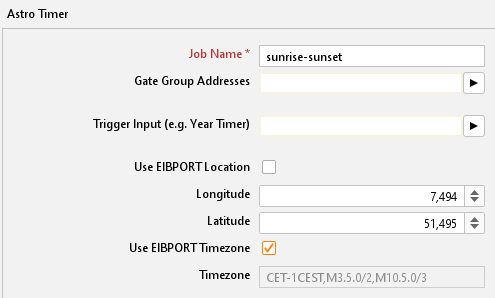
Job Name
Required field. Assign a unique name for the job. The name must not contain more than 15 characters.
Gate Group Addresses
By Gate Group Addresses job will be released or blocked. The release object releases or locks the job. It is about an EIS1 object:
Field blank = Job is released.
Field completed, value 1 = Job released.
Field completed, value 0 = job locked.
Field completed, no value = job locked.
As soon as one address is filled in, release will behave respective to the value of the group address. If no value was sent to the address and the address is presently without values, job will be blocked.
Position- and Time specification
To specify time and position for the Astro timer job the EIBPORT can either revert to its adjusted location of installation or a manual input can be done. The location of installation can be changed in “System” > “Configuration” > “General” > Location of installation”. Is this setting been used the EIBPORT identifies automatically the correct latitude and longitude (geographical centre of the corresponding country) as well as the matching time zone. This data is displayed in a greyed-out array in the job mask and is not adjustable. With a manual input there should be more experienced knowledge available about the facts. Additionally, it is important to follow the syntax which is described in the mouse-over-help of “longitude” and “time zone”.
Job Editor Classic – Job Astro timer / global settings
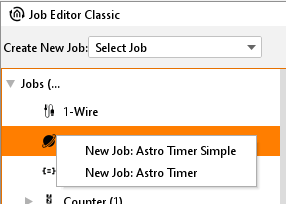
Astro Timer simple
When creating a new Astro Timer job there is appearing a choice where two different configurations mask can be selected. With the choice “Astro Time simple” you will reach the standard configuration mask of the job. Beside the previous mentioned essential position- and time specification it can be assigned a name and a gate object to the job. Below that the settings for sunrise and sunset are made:
Job Editor Classic – Job Astro timer simple
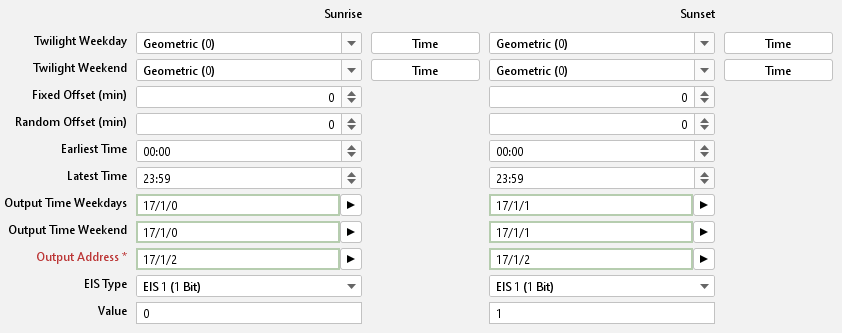
Twilight Weekday
Please specify here at which point in time from Monday to Friday should be sent something on the output. The point in time can be either determined through a choice of one of the twilight stages or by entering a time. When selecting a twilight stage, the “Time” Button can be used to verify switching time of the current setting. By presetting a switching time in the “Time” – dialogue, in the entry array of the twilight stages there will be entered an arc minutes value which correspond to the switching point of the current day instead of the twilight name.
Twilight Weekend
At this point the switching times for the two weekend days Saturday and Sunday will be set. This is happening similar to the settings about “Twilight Weekday”.
Fixed Offset (min)
Specifies the time span in minutes that the switching time should be suspended forward or backwards. If the switching should happen earlier a negative value is to be entered and if the switching should happen later a positive value must be set.
Random Offset (min)
With this offset the really circuit time will be suspended for a random value later. In which period of time the random offset happens, can be set here in minutes. By this setting a presence simulation can be realised.
Earliest Time
This time intended from which point the output is allowed to be send earliest. This is to avoid switching time earlier than a certain point in time. For instance: Never earlier than 7 o’clock in the morning or 8’clock in the evening.
Latest Time
Over this time, it is able to avoid switching time later than a certain point. For instance: Never later than 8 o’clock in the morning and 10 o’clock in the evening.
Output time weekdays
For each weekday the identified switching times will be sent out on this EIS 3 output object. It will be sent at 0 o’clock at the beginning of the day. The arrow symbol near the address input array allows to display an address matrix, or if happens before, to choose an address out of the ESF file of the ETS (please see “export ESF file out of the ETS”).
Output time weekend
For each day on the weekend the identified switching times will be sent out on this EIS 3 output object. It will be sent at 0 o’clock at the beginning of the day. The arrow symbol near the address input array allows to display an address matrix, or if happens before, to choose an address out of the ESF file of the ETS (please see “export ESF file out of the ETS”).
Output address
Required entries. On this output address the defined output will be sent at the determined time. The EIS type and the output value will be set in the arrays below it. The arrow symbol near the address input array allows to display an address matrix, or if happens before, to choose an address out of the ESF file of the ETS (please see “export ESF file out of the ETS”).
EIS Type
Determine the EIS type of the output. EIS 1, EIS 5, EIS 6, EIS 14 and EIS 15 are available.
Value
Determines the value of the telegram. The value must correspond to the configured EIS type.
Astro Timer (complex)
The Astro timer complex offers compared to the “Astro timer simple” more enhanced features and a trigger object. To realise a simple Astro timer function please use the job mask “Astro timer simple”. Beside the above already mentioned and essential position and time information the job can be allocated a name and a gate object as ever. In addition, there is the ability to enter an EIS 14 trigger object.
Job Editor Classic - Astro timer (complex) - define point in time
Trigger input
Over the trigger input it is able to trigger three special points in time which are configured later in the job mask. Also, a linkage with the year-timer can be established over this object. The arrow symbol near the address input array allows to display an address matrix, or if happens before, to choose an address out of the ESF file of the ETS (please see “export ESF file out of the ETS”).
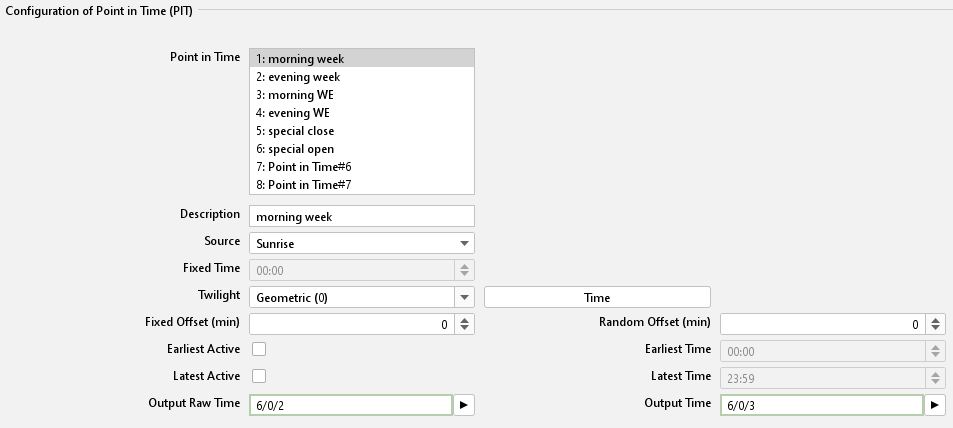
Configuration of Point in Time (PIT)
With this configuration there will be specified the points in time which should be used later in the “output configuration”. There can be set maximum 8 points in time. To set up a point in time it shall be marked in the list of “point in time” and configured as desired. The point in time should get a unique name.
Example:
If a blind is supposed to be moved at sunrise there should be entered 2 points in time; One for weekdays with the name “Sunrise weekdays” and for weekend with the name “Sunrise weekend”.
Point in Time
Is showing the specified points in time by their names. To view the configuration of a point in time it just must be marked by the mouse while the settings will be display in the corresponding arrays.
Description
Meaning the unique name that is given to the point in time. With the help of this name the point in time has been identified at the output configuration.
Source
This is the point in time from which all further calculations are done (Offset etc.). Additionally, it will be defined if it is about a sunrise, sunset, a sun peak or a fixed point in time.
Fixed time
If there is set the “fixed time” at the source choice a fixed point in time can be entered here. Otherwise, this field is greyed out.
Twilight
With this choice the five twilight stages can be chosen. The reference point in time can be checked by using the button “Time” next to the “Twilight” menu. Behind the twilight stages the twilight value has been given in the unit arc minutes.
Time
With the Time button it is not only possible to view the point in time of the twilight stages, but also vice versa to enter the twilight value in arc minutes. To do that the desired time is entered into the time dialogue. After clicking “OK” at “twilight” arc minutes will be entered instead of the name. If you enter 06:15 am in the time dialogue for instance a twilight value of -570 arc minutes will be filled in. The calculated value alters of course from day to day.
Fixed Offset (min)
With this entry array the before selected reference point in time (source) will be shifted for specified number of minutes. A negative value is setting the point in time earlier, a positive value sets it later.
Random Offset (min)
With this entry array the reference point in time can be delayed by a random number of minutes. The settings are made within steps of 5 minutes. The random point in time is then lying somewhere within the delay time. With the help of this setting a presence simulation can be realised.
Earliest Active / Earliest Time
Earlier than this point in time the output is not been switched. E.g.: If a blind should never shut earlier than 07:30 o’clock am.
Latest Active / Latest Time
Determines the latest point in time at which the output is allowed to be triggered. E.g.: If a blind should never shut after 10:30 o’clok pm.
Output raw time
This EIS 3 output object is giving the absolute reference time (raw time). With this point in time neither fixed, random nor earliest or latest times are considered. So, this is not necessarily the point at which the output telegram has been sent. The arrow symbol near the address input array allows to display an address matrix, or if happens before, to choose an address out of the ESF file of the ETS (please see “export ESF file out of the ETS”).
Output time
This EIS 3 output object is giving out the original point in time. In this time all offsets and the time limitations are considered. That is the point in time at which the telegram has been sent. The arrow symbol near the address input array allows to display an address matrix, or if happens before, to choose an address out of the ESF file of the ETS (please see “export ESF file out of the ETS”).
Output configuration
If all necessary points in time are specified in the list of “Configuration of Point in Time (PIT)”, they will be related with the outputs in this configuration area. There can maximum 48 outputs be set.
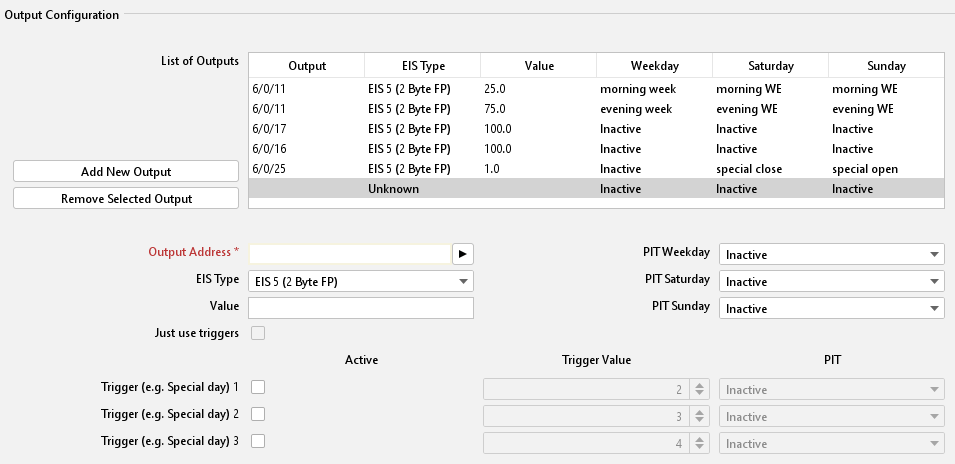
Job Editor Classic - Astro timer (complex) – Output configuration
List of Outputs
The created outputs will be shown in this table. Thereby the output address, the EIS type, the valency of output and the relation to the point in time will be displayed.
Add new Output
To add a new output must add a new entry will be added to the list. Is clicked, this happens in the button "Add Output". The list of outputs appears a marked entry "Unknown" and the input fields are activated below.
Output Address
Mandatory Array. In this array the proper output address has been entered. So please fill in the address of the object you want to control. The arrow symbol near the address input array allows to display an address matrix, or if happens before, to choose an address out of the ESF file of the ETS (please see “export ESF file out of the ETS”).
EIS type
The EIS type of the output has been set. There are EIS 1, EIS 5, EIS 6, EIS 14 and EIS 15 available.
Value
It is determining the value of the telegram. The value must correspond to the preset EIS type.
PIT Weekday (PIT = Point in Time)
Within the output address it is specified which object /device has been controlled. The PIT choice appoints when the control is happening. In the menu the list of the before configured points in time is available. If the PIT is set to “inactive” there will be nothing executed. Example: Should the blind at sunrise weekdays use the configured point in time “Sunrise Weekday”, it must be chosen in this menu.
PIT Saturday / Sunday
With this both menus it is possible to specify the points in time for the weekend. Is it proposed that on weekend the same point in time as on weekdays should be valid, it would be easily related to the “weekdays-point in time”. If there should be other point in time used on the weekend, they have to be configured first in the list of point in time.
Save the outputs:
To save a configured output there must be clicked on “Add new output” again or an already defined output must be chosen in the list.
Remove selected output
To remove a selected output this one must be marked in the list (blue colour).
Trigger Configuration
To use the trigger function resp. the linkage to the Year Timer a trigger address must be filled into the input object of the job. The triggers will not appear in the “List of outputs” overview but will only be visible if the corresponding entry in the list has been marked.
Linkage with the Year-Timer
In order to realise a connection to the Year-Timer the trigger object of the Astro Timer must be related to the output of Year-Timer. The Year-Timer provides the possibility to set the special days 1 to 3 on a calendar timeline (please see Job “Year-Timer”). It then initiates with the EIS 14 values 2 – 4 the complying trigger configuration of the Astro Timer. In the Astro timer the trigger values are accordingly preset.
Note: For each Astro Timer can be set maximum three trigger objects. If are more special points in time are required there must be created multiple Astro-Timers.
Trigger (e.g., Special day 1, 2, 3)
With this checkbox the trigger is enabled. The trigger is listening on the trigger address entered in the job mask.
Trigger-Value
In this entry array the EIS 14 value must be set from which the trigger should be forced to work with (0-255). For the linkage with the Year-Timer the following values are valid:
Disabled = 0
Week mode = 1
S1 = 2 (S= Special day)
S2 = 3
S3 = 4
PIT (Trigger)
Like the normal output configuration every trigger has to be assigned a point in time. It is selected in the menu “PIT” and accesses to save the same list which is configured in the “Configuration of Point in Time (PIT)”.
Just use triggers
With the help of this checkbox, it is determined if an output is only controlled by the triggers or if the trigger and the normal weekday/weekend configuration should run parallel. If this option is activated the point in time choice for weekdays and Saturday/Sunday will be disabled.